Tile Studio
Ribbon: BimSpeed.ARC → Tile Studio (Vietnamese ribbon label: Ốp lát gạch). These screenshots come from the real Revit 2027 window.
These are full-screen Revit 2027 captures. Click a crop to open the original screenshot.
① Open BimSpeed.ARC; ② in Model, click Tile Studio on the second row below Finish Rooms Settings.
Download the three practice models (.zip) — use 03-Tile-Studio-Revit-2027.rvt for this exercise.
1. Choose a surface
- Open the practice model in Revit 2027 and save a working copy. Click BimSpeed.ARC → Tile Studio.
- Click Pick Room for an interior room floor, or Pick floor / wall face for an outdoor floor or wall surface, then click the element/face in Revit. Surface at the top of the window shows the current target and lets you switch surfaces.
- If the practice view has no suitable Room, pick a floor face directly. The Tile Studio window remains open as you switch surfaces.

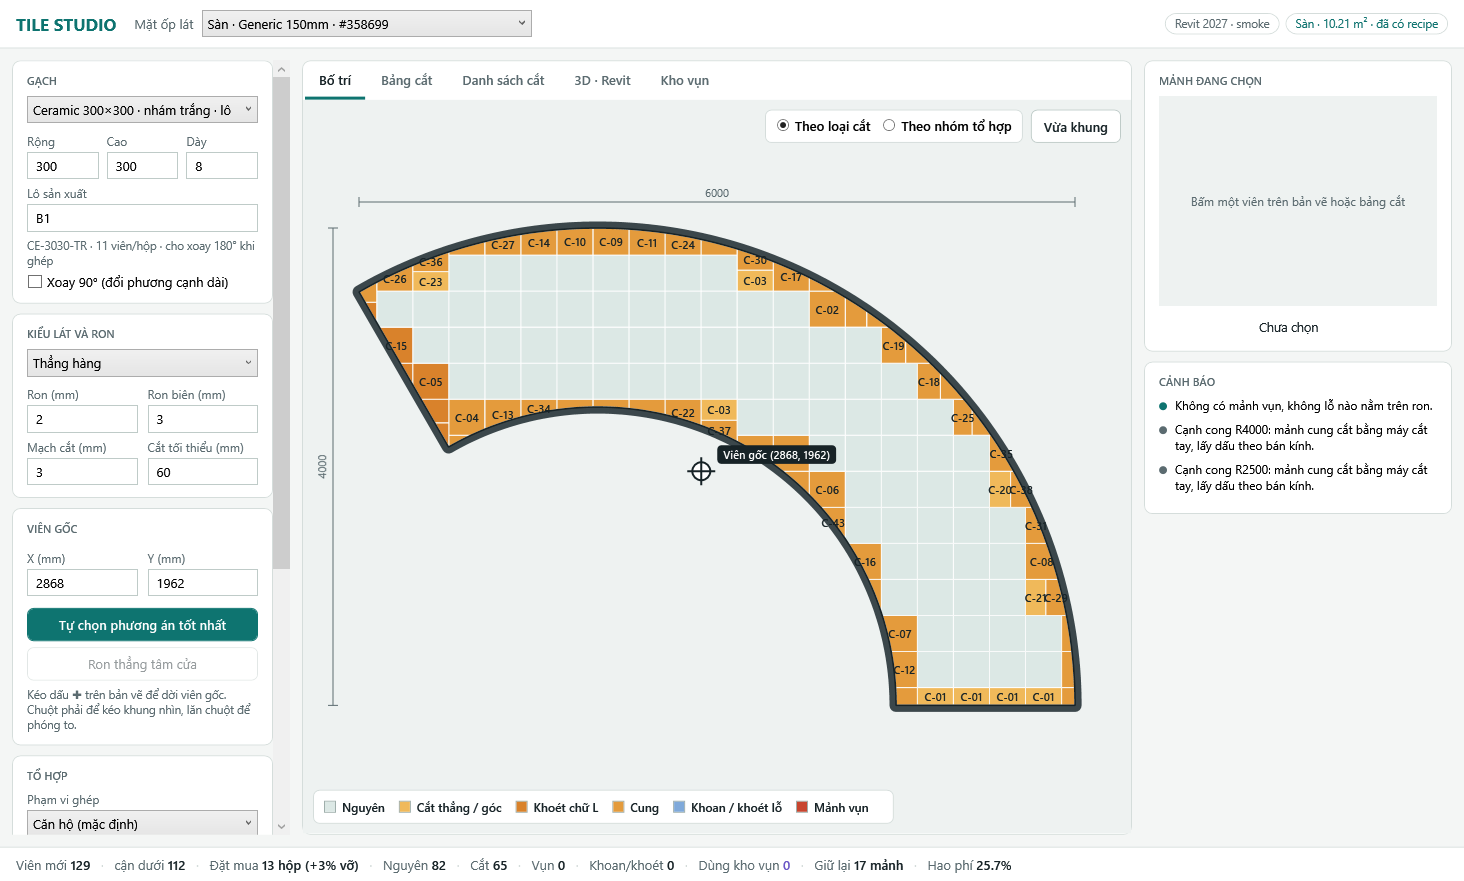
① current surface; ② tile SKU/size/thickness/batch; ③ pattern and joints; ④ origin tile and auto-choice; ⑤ result tabs; ⑥ color-coded layout and cuts.
2. Set up the layout
- Under TILES, select a SKU and verify Width / Height / Thickness, production batch, and Rotate 90°. Dimensions are in mm and affect quantities and cut combinations.
- Under PATTERN & JOINTS, select a pattern and enter joint width, perimeter joint, saw kerf, and minimum cut. Drag the ✚ on the layout or enter X/Y to move the origin tile. Auto-select best option searches for a favorable origin. Center joints on door becomes available when applicable.
- Open Layout to inspect whole tiles and color-coded cut types. Click a tile to see the selected piece on the right. Under COMBINATIONS, select a grouping scope and optionally reuse scraps with the same SKU and batch. The Deep optimization (CP-SAT · Worker) button is disabled in this version; the visible quick combination is available.
What each setting changes
| Control | Purpose | What to inspect after changing it |
|---|---|---|
| Surface / Pick Room / Pick floor or wall face | Selects the boundary and Revit host for the 3D tiles. | Surface name and area chip at the top. |
| SKU, Width, Height, Thickness | Defines tile size/type used for layout, cuts and 3D output. | Tile count, boxes and cut sheets; dimensions are mm. |
| Production batch | Separates materials; scraps are reused only with matching SKU and batch. | Inventory and selected batch. |
| Rotate 90° | Swaps the long-edge direction. | Layout and waste before/after. |
| Pattern | Sets aligned or offset rows. | Appearance and edge cuts at doors/corners. |
| Joint / Perimeter joint | Gaps between tiles and along wall edges. | Row/column count and cut-piece sizes. |
| Saw kerf | Material lost to each cut. | Cut-sheet combinations and waste. |
| Minimum cut | Avoids very narrow pieces. | Warnings and alternative layouts. |
| Origin tile X/Y or drag ✚ | Moves the starting point of the layout grid. | Left/right edge balance, tile count and boxes. |
| Auto-select best option / Center joints on door | Searches a favorable origin; aligns a joint with an eligible doorway. | Review candidates in Layout before writing 3D. |
| Combination scope / Use scrap inventory / Retain offcuts from | Controls cut-piece matching and which offcuts enter inventory. | Cut sheets, inventory, new tiles and waste. |
| Write 3D / Export CSV | Writes tiles to Revit or exports the construction cut list. | Writing the same surface again replaces that surface's Tile Studio tiles. |
Example: change a 600 × 300 tile to 300 × 300 with a 2 mm joint, click Auto-select best option, and compare boxes and waste in the footer. Then move the ✚ origin, inspect edge pieces in Cut sheets, and only then Write 3D to Revit.
3. Inspect cuts and write to Revit
- Open Cut sheets to see every source tile, factory edges, saw cuts, and retained scraps. Cut list summarizes codes, sizes, counts, and positions. Scrap inventory lists reusable pieces. The bottom status bar shows new/whole/cut tiles, purchase boxes, and waste.
- Scroll the left panel to EXPORT and click Export cut list (CSV) if needed. Review warnings on the right, especially curved boundaries and pieces below the minimum cut.
- Click Write 3D to Revit to create tiles in the model. View them in 3D · Revit or the Revit window. Writing the same surface again replaces Tile Studio tiles previously written for that surface; save a model copy before comparing options.

① Cut sheets tab; ② source tiles and saw lines; ③ material and waste summary. This image uses a different surface in the same test set, so its counts differ from the layout above.
Open each RVT with the Revit version in its filename and use Save As before creating bars or 3D tiles. The ZIP contains input models for all three exercises.