


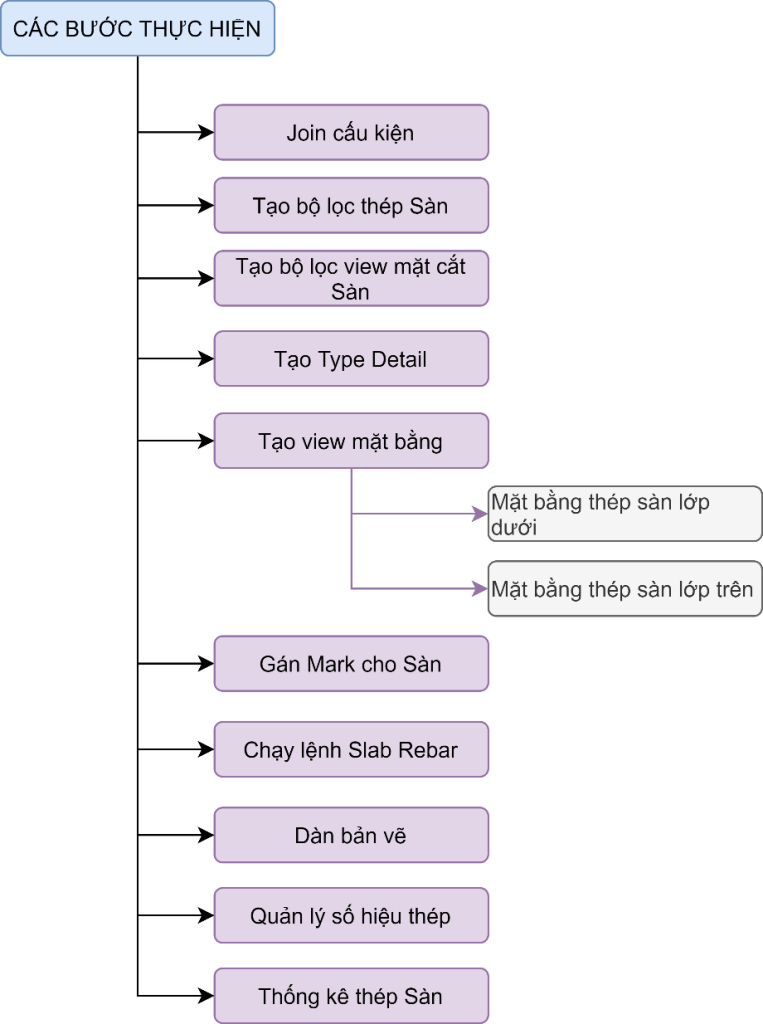
Các bước thực hiện:
Trong tài liệu này mình hướng dẫn các bạn cách triển khai thép và trình bày bản vẽ cấu kiện Sàn.
Hình dưới đây là quy trình mình đề xuất để các bạn nắm tổng thể các bước thực hiện.
Bước 1: Join cấu kiện:
-
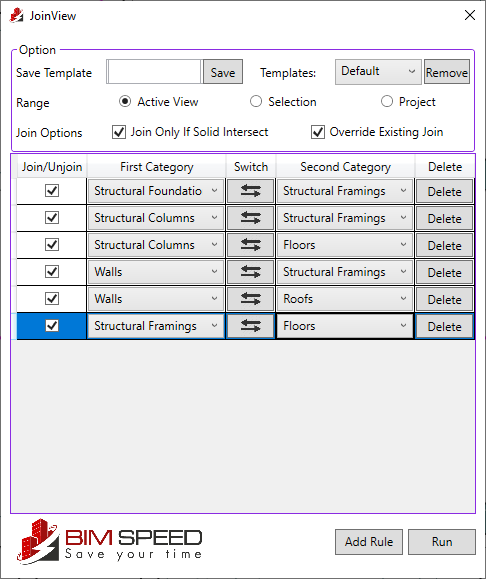
- Tại bước này, các bạn cần Join ưu tiên cấu kiện được hiểu giao trừ phần hình học ưu tiên mà BIM Speed khi vẽ thép Dầm được chuẩn nhất
- Ngoài ra việc Join cấu kiện này giúp bạn tính toán được khối lượng cấu kiện
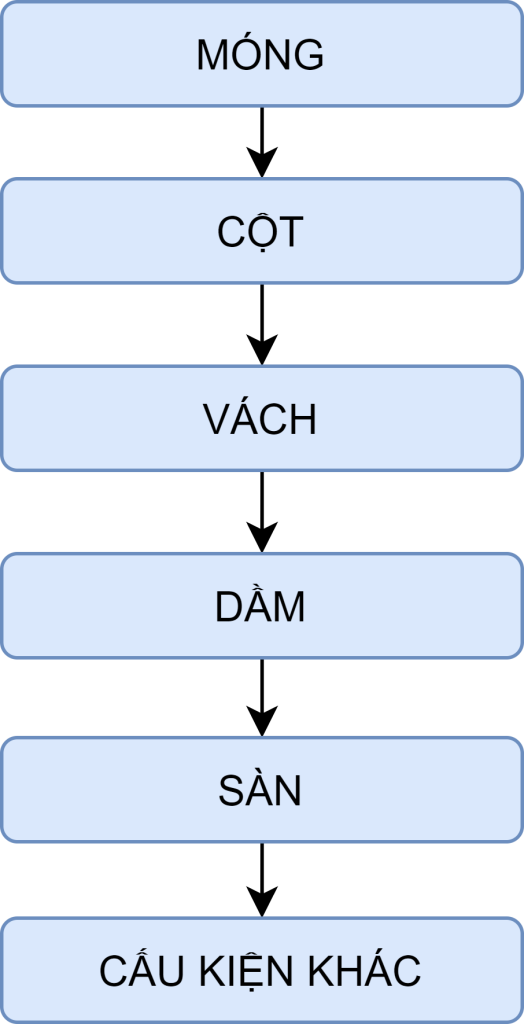
- Thứ tự ưu tiên Join (đề xuất):
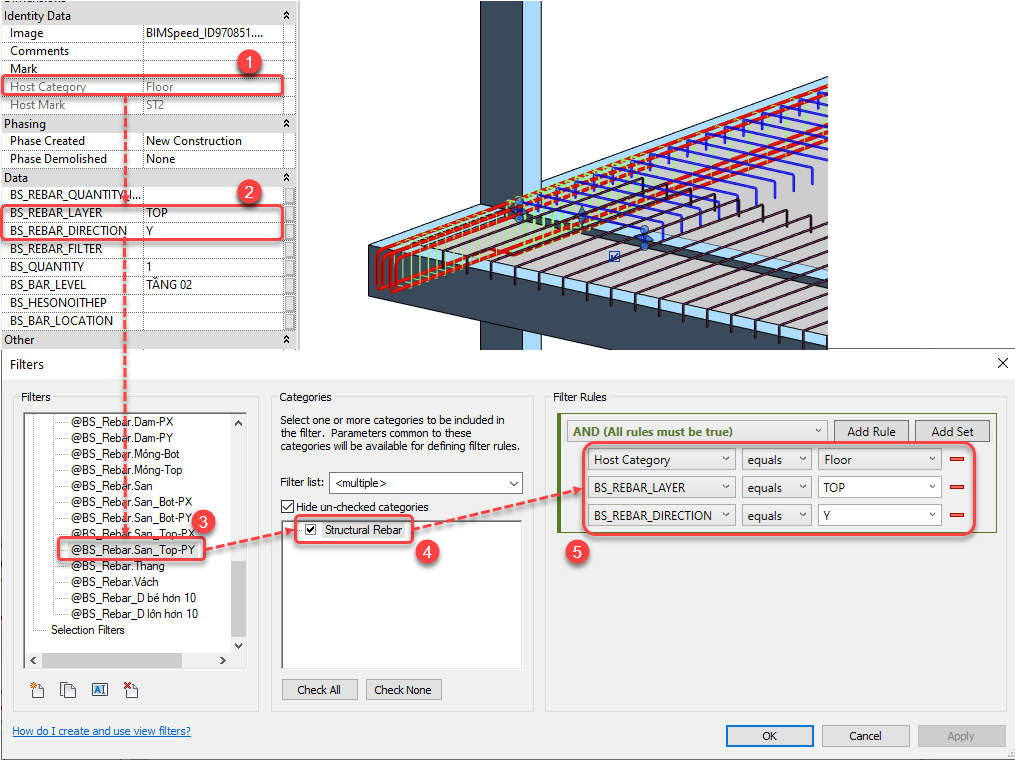
Bước 2: Tạo bộ lọc Thép.
- Tại bước này thường sẽ được tạo trước khi chúng ta làm dự án, do đang hướng dẫn mình cần phải thêm bước này vào trong quy trình.
- Mục đích của việc tạo bộ lọc thép giúp bạn bật tắt các loại thép không mong muốn hiện trong View đang làm.
- Nguyên lý:
- Thép bắt theo Host Category cấu kiện bê tông thì bạn dựa theo đó để tạo bộ lọc Thép tương ứng với cấu kiện.
Ngoài ra các bạn tạo thêm parameter or sử dụng parameter mà BIM Speed tạo để gán thêm điều kiện đặc thù của mỗi cấu để đưa vào bộ lọc giúp ta kiểm soát tốt hơn.
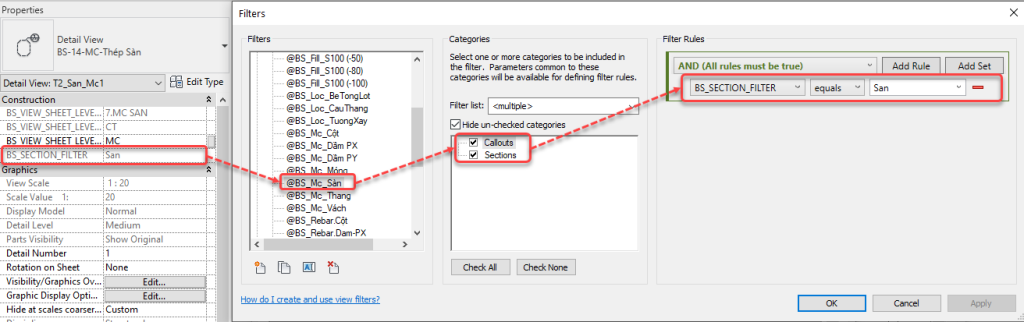
Bước 3: Tạo bộ lọc View mặt cắt.
-
- Trong bước này ta cần tạo bộ lọc bật tắt các View mặt cắt khác hiện vào trong view đang làm triển khai.
- Các bạn lưu ý khi tạo cần thiết lập quy tắc đặt tên lọc Mc sao cho khi qua dự án mình có thể sử dụng tiếp. Nghĩa là bạn cần chuẩn hóa đầu vào khi làm 1 dự án.
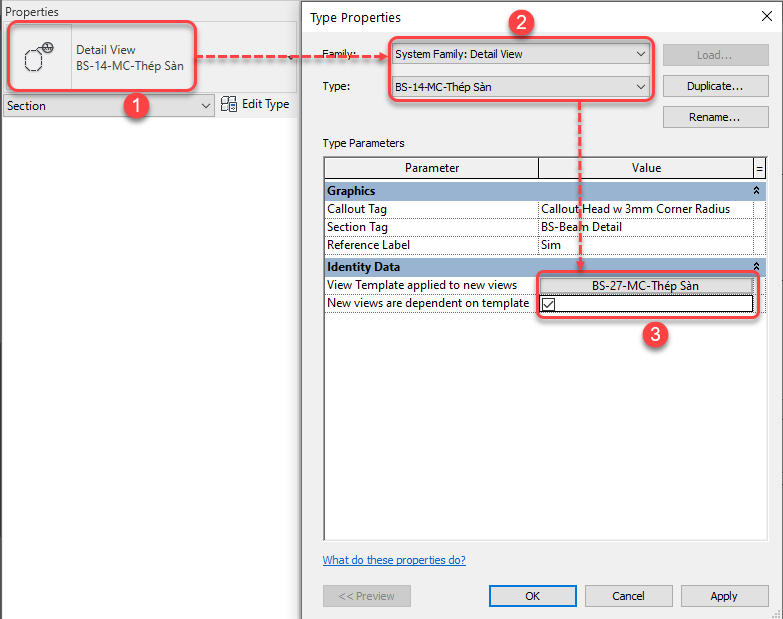
Bước 4: Tạo Section type & Detail type.
-
- Trong bước này bạn cần tạo trước
- Detail mặt cắt Thép Sàn
- Bước này lưu ý bạn cần tạo luôn Template và đưa áp dụng vào trong các Type mình vừa tạo ở trên. Mục đích giúp ta rút ngắn việc add view template vào từng view nhanh chóng hơn.
- Hình ảnh minh họa.
- Trong bước này bạn cần tạo trước
Bước 5: Gán tên cấu kiện
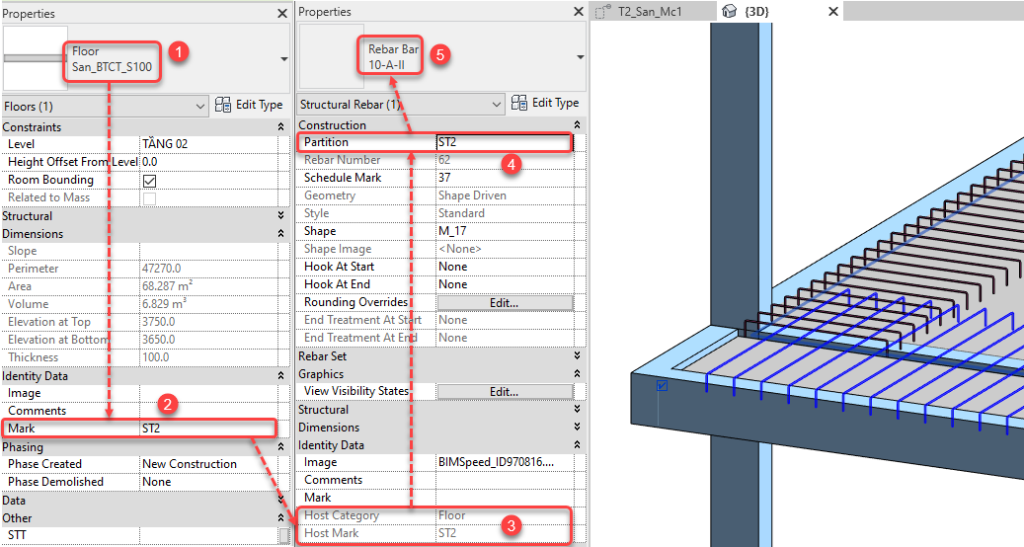
- Ở bước này các bạn cần lưu ý cho mình, cần đặt tên cấu kiện Cột hay bất kỳ cấu kiện bê tông nào trong dự án cần đặt tên cho cấu kiện trước khi tiến hành vẽ thép.
- Bạn đặt tên cấu kiện vào mục “ Mark” trên phần mềm Revit khi tick chọn đối tượng nó sẽ hiện ra cho bạn chọn.
- Mục đích ở bước này giúp phần mềm vẽ thép nhận diện được tên Host cấu kiện để gán tên Host cấu kiện bê tông vào thanh thép, cụ thể là gán vào mục “Partition” khi bạn tick chọn vào thanh thép nó sẽ hiện ra.
- Các bạn xem hình minh họa ở trang tiếp theo.
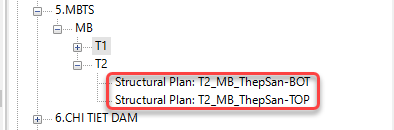
Bước 6: Chuẩn bị 2 mặt bằng để triển khai thép.
- Mặt bằng thép lớp trên
- Mặt bằng thép lớp dưới
- Khi tạo sẵn 2 view mặt bằng này các bạn cần gán View template và kiểm tra các điều kiện filter lọc thép, lọc mặt cắt….
Bước 7: Triển khai Thép
- Ở bước này các bạn cần lưu ý chia 2 phần chính: Giao diện và Cách trình bày bản vẽ
Phần 1: Giao diện
➔ Thiết lập chung :
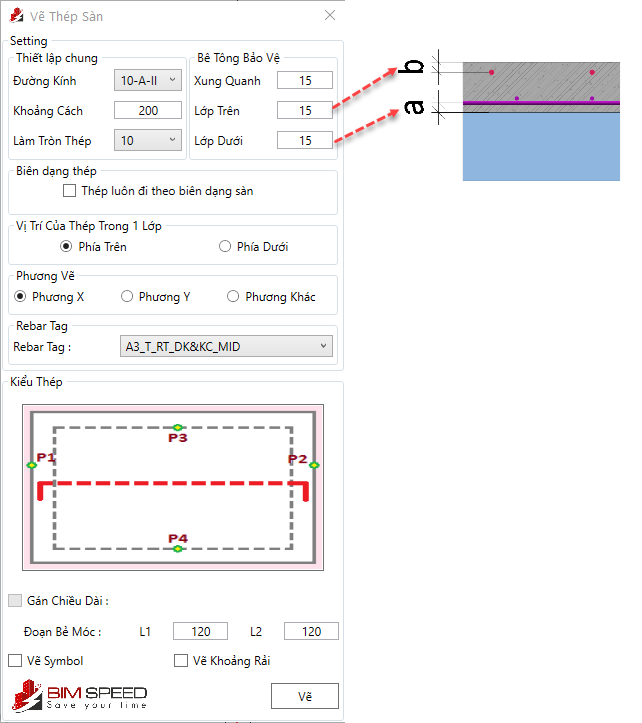
➔ Vẽ thép theo biên dạng :
- Mục này áp dụng khi biên sàn đang vẽ dạng tuyến tính

➔ Phương vẽ thép :
- Theo hình minh họa các Bạn sẽ thấy phương đặt theo được quy định như hình dưới.
- Phương nằm ngang song song với trục X của Revit
- Phương nằm đứng song song với trục Y của Revit
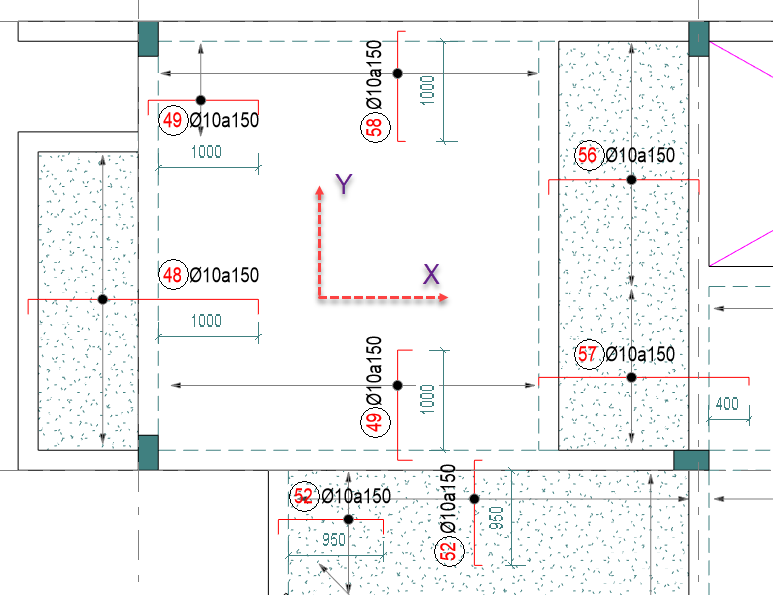
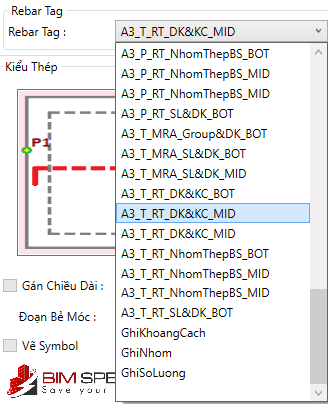
➔ Tag thép :
- Theo hình minh họa các Bạn sẽ cần chọn loại tag thép có ký hiệu chữ MID sau cùng.
- Và sử dụng loại Tag ( Đường kính + Khoảng cách “ A3_T_RT_DK&KC_MID”)
- Và sử dụng loại Tag ( Đường kính + Khoảng cách “ A3_P_RT_DK&KC_MID”)
➔ Kiểu đi Thép
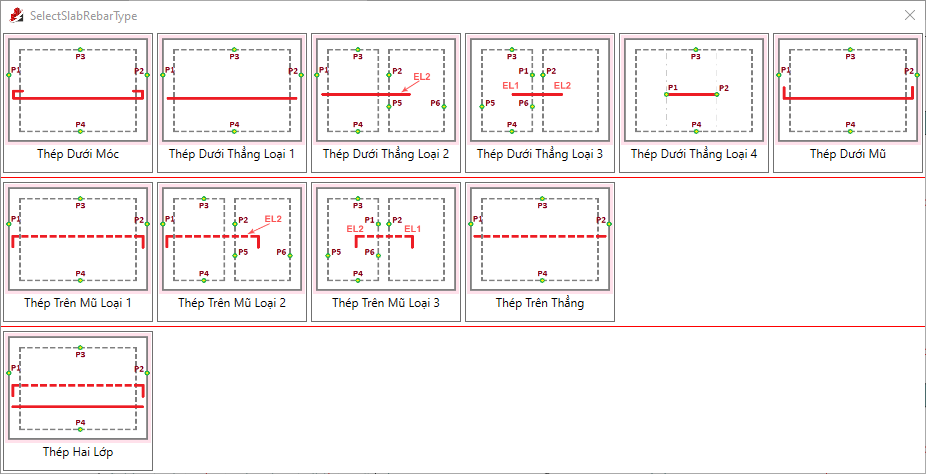
➔ Cách vẽ và tính toán chiều dài.
- Điểm P1 & P2 là điểm đặt bắt đầu và kết thúc của thanh thép
- Điểm P3 & P4 là điểm vuông góc với thanh thép, nhằm mục đích tính toán vùng rải thép từ điểm P3 qua điểm P4.
- L1 & L2 là chiều dài đoạn bẻ móc.
- EL2 là đoạn đầu thừa nếu không tính theo hệ L cạnh ngắn/4 thì bạn nhập thẳng vào ô này để xác định chiều dài.
- Vẽ SymBol & Vẽ khoảng rải là ký 2D trên mặt bằng, nếu tích vào khi vẽ mới xuất hiện trên view bạn đang triển khai.
Trang trước
Hướng dẫn thống kê thép MóngTrang sau
Hướng dẫn vẽ thép Sàn